Plant Interface
For the first project of IGME-470, we were tasked with creating a device with the Arduino that would take some form of input from a plant or its environment, and then do something with that data. One of the suggested forms of input was a moisture sensor - two prongs that would stick into soil and report the soil's moisture level. However, I had a better idea in mind for my bamboo plant, Charlie.
The Idea
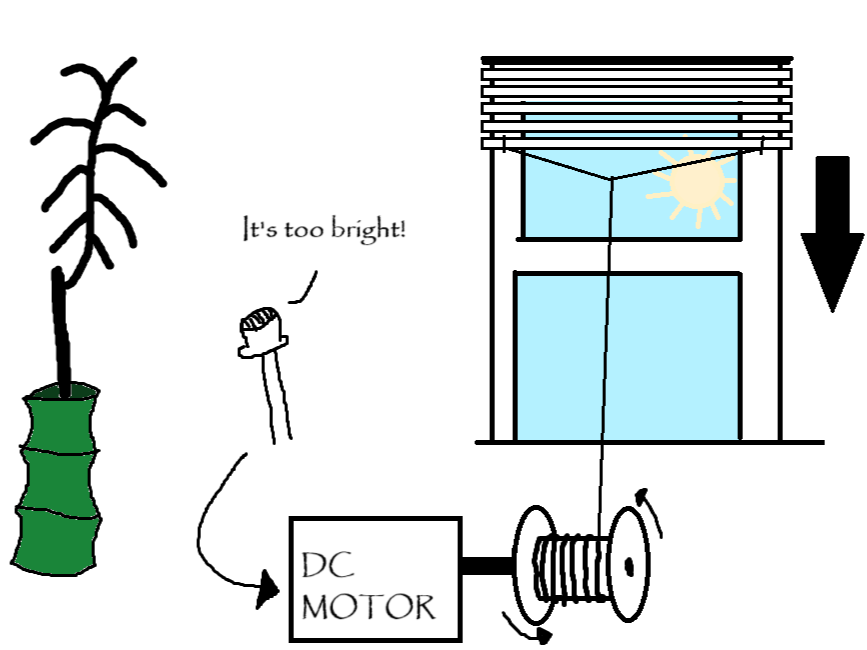
Every student in class was tasked with creating a pitch presentation for the project, which we would then present in class. I commissioned a very prolific artist to create the sketch for my idea (seen to the right), which was heavily featured in my presentation. Here's the concept; my bamboo plant, Charlie, is quite sensitive to light. In fact, if he gets too much sunlight, it's not good for him. With the Arduino, I planned to utilize a photostransitor to sense the light level around Charlie, and close the blinds with a DC Motor and a spool of string if it were too bright. I got the A-OK from our instructor Nick, purchased my materials, and moved on to the testing phase, to make sure my idea would actually work.
Initial Testing
After my presentation, a classmate asked me if the DC motor would be strong enough to pull down the blinds. During my preliminary research, I came across a forum where someone was attempting to build an automatic chicken coop door with an Arduino, which would use a motor to lift and close the door. Plus, I saw how fast the DC motor spun during the Zoetrope assignment, so I didn't think the strength would be a problem. I created a simple circuit with a 9V battery powering the DC motor, attached my spool to the blind, and witnessed as my spool failed to spin... at all. Well, that wasn't gonna happen. The thought crossed my mind to use LEGO gear to increase the strength of the motor, but due to the difficulty of acquiring the necessary parts, I opted for a different idea. Instead of pulling down the blinds, what if I were to pull up my own blinds - like a paper bag? So, that was the new goal - when the Arduino sensed too much light, it would pull a paper bag over the window to block out the light. To make a long story short, the paper bag was also too heavy. In the end, I was only able to lift a single piece of paper. I learned to accept this reality, and make the most out of it. Ultimately, my goal was to use a DC motor and a spool of thread to make "something" move. The "something" isn't the important part to me - as long as the pulley moved "something," I would be happy. With this new knowledge gained, I began working on the final product.
Entering Production
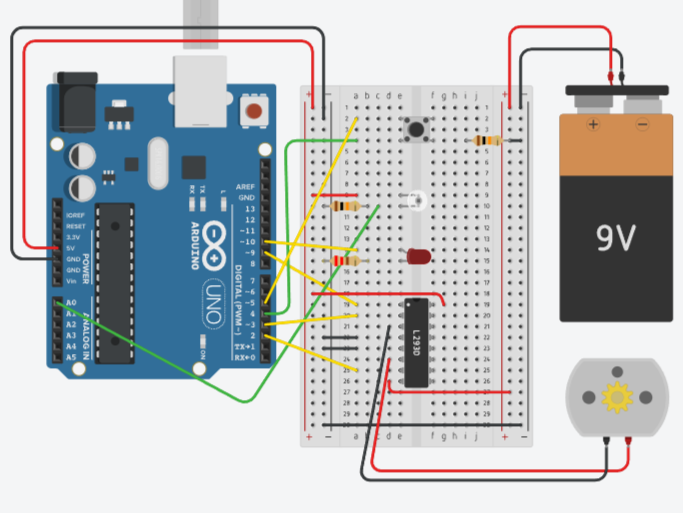
Before doing anything on the physical breadboard, I drafted the circuit on TinkerCad, which was a
smart
move.
Using the Zoetrope assignment as inspiration, I placed an H-Bridge on the circuit, which will easily
allow me
to control the motor's speed and direction. The photostransitor is set up just like how it was in
other
assignments,
so we can easily read its value via the analog pins on the Arduino. Although these components were
sufficient to preform
the necessary actions, I added two other components for ease-of-use. For one, I placed a red LED on
the
board, which will
serve as a simple actuator to signify when the plant is receiving too much light. Lastly, I placed a
push button on the circuit,
which will serve as a "start" button. When the circuit first turns on, nothing will happen until
this
button is pressed. This
means that during testing, if something were to go horribly wrong, I can press the reset button on
the
Arduino's board, and be sure
that everything will stop until the start button is pressed. Feel free to view the circuit's
schematic and parts list if
you'd like.
After replicating the schematic on my physical breadboard, I began the process of writing the code
for
this project. I used the
starter code from the Zoetrope homework as a base, since I was a bit rusty on the fundamentals of
how to
interact with an H-Bridge.
After adding functionality for the button, LED, and photostransitor, all that was left was the code
for
raising the paper sign.
In the end, I just made it run the motor for one and a half seconds.

The Final Result
In the video to the right, you can see that the device does not activate until I press the start
button.
Once the button is pressed, the photostransitor immediately reports that it is too bright in the
room.
The red LED activates, and the sign saying "Too Bright" is wheeled into place. Once I lower the
blinds to the
appropriate position, you can see that the LED deactivates, showcasing that Charlie is now content.
Although this device does not pull down the blinds on its own, I think it successfully notifies
anyone in the vicinity
that something needs to be done.
References
Brick Experiment Channel. Making a GOOGOL:1 Reduction with Lego Gears. YouTube, 16 May 2020,
https://www.youtube.com/watch?v=QwXK4e4uqXY&ab_channel=BrickExperimentChannel.
Fitzgerald, Scott, and Michael Shiloh. Arduino Projects Book: Everything You Need for Your First
Arduino® Projects. Arduino, 2015.